Mercantile & Artistic Paperie

...................................Your MAP to creativity.

Navigation

  • Home
  • Online Store

Tuesday, July 19, 2016

Which inks to use for your project? - from Imagine Crafts

Imagine Crafts has published a wonderful article expressing how to use inks properly for the many different arrays of  crafts on the market.  Please enjoy this article by Imagine.

Which Ink Should I Use in My Project?


Posted on July 18, 2016 by Imagine

That’s a Great Question!


Whether you are just learning to craft, scrapbook, or art journal, or are a seasoned pro, it can still be overwhelming to make buying decisions with all the different products available. There are just so many options! You’ve decided on a project, what your medium is going to be and now you just need some ink—but you find out that too is complex. Often there is no exact right or wrong between different inks therefore choosing which one can seem overwhelming. Here’s some information about the different inks you will find to hopefully help you know what inks you might need for your projects!
We break it down into three types of ink: dye ink, pigment ink, and solvent ink. Most of the varieties offered for papercrafters are dye and pigment inks, but sometimes solvent inks are just what you need, plus they work great for glass, metal and ceramics as well. In building your knowledge, it is best to know how each type of ink behaves to determine what option you need to achieve your project’s desired result.
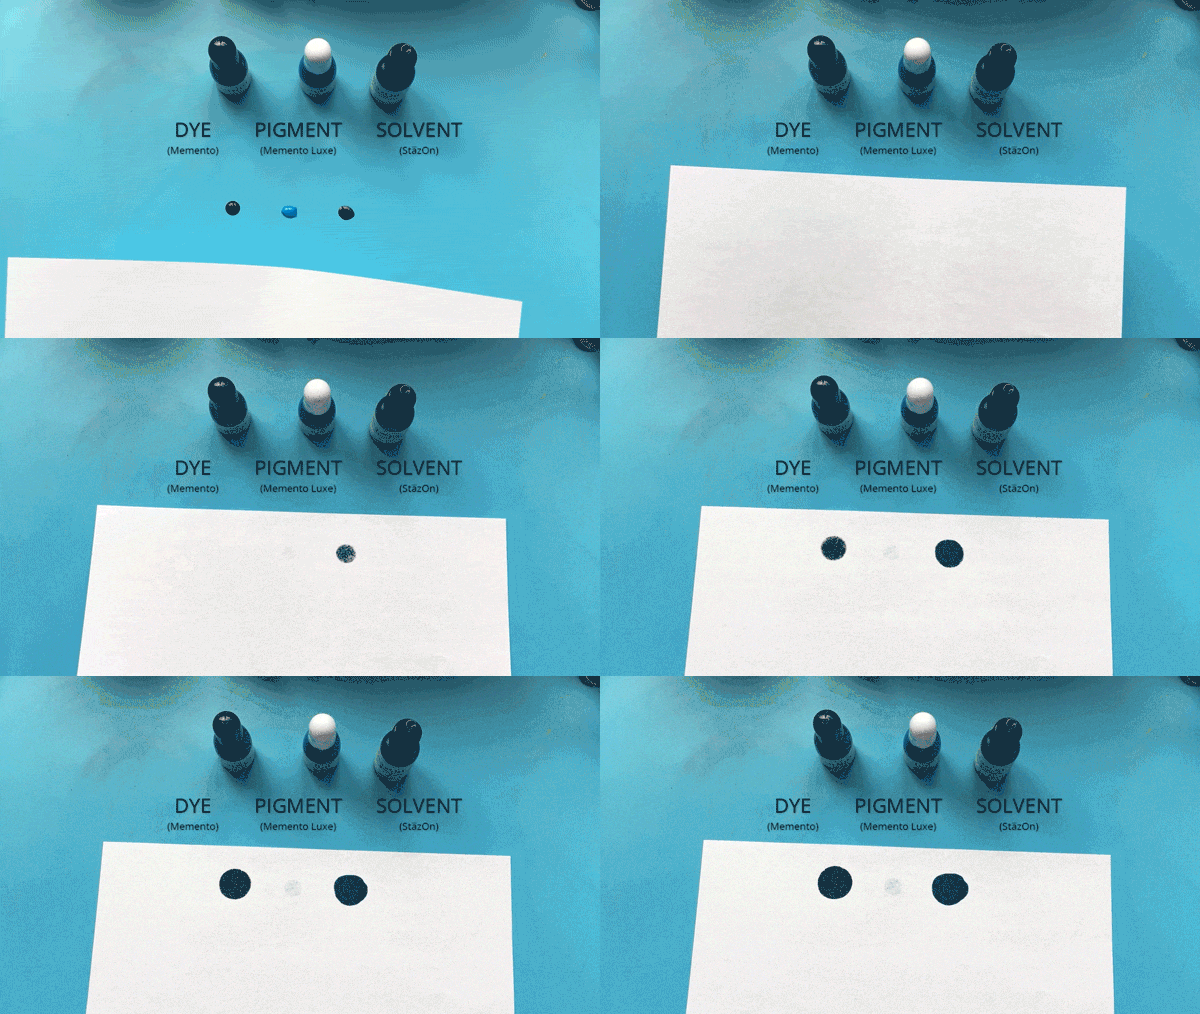
A white piece of text paper is laid across three puddles of ink, one dye, one pigment and a solvent ink. The dye and solvent inks absorb into the paper while the pigment ink does not.
Dye Inks
Dye inks are made up of a water-based solution and a soluble dye. Soluble means they mix in to the water like sugar in tea. Dye inks soak into paper, dry quickly, and usually have a bright translucent appearance. Picture the dye inks bleeding down into the paper and coloring the paper fibers. It is similar to how food coloring blends into food. The quick drying time can be an asset as you can stamp a card and place it in an envelope without worry of smearing or staining. They can also be used much like watercolor paints and be blended and softened by adding water to the ink or pre-wetting your paper. Dye ink fades a bit over time, particularly in direct sunlight. This is why dye inks have non-visible palette cases—a super easy way to distinguish from the pigment inks at the craft store. Our lines of dye inks include Memento, Kaleidacolor, Fireworks! Sprays and Walnut Inks. Ink Potion No. 9 is a popular blending solution often used with dye inks.
Watercolor paper was sprayed down with Ink Potion No. 9 before sweeping Memento Summer Sky across it. A wet brush was used to watercolor some Memento Pear Tart along the bottom edge. Memento Love Letter inkpad used with a cute kite stamp, Kaleidacolor in Spectrum was stippled across the left, and the word Fly was written on with Memento Dual Tip Marker.
Watercolor paper was sprayed down with Ink Potion No. 9 before sweeping Memento Summer Sky across it. A wet brush was used to watercolor some Memento Pear Tart along the bottom edge. Memento Love Letter inkpad used with a cute kite stamp, while Kaleidacolor in Spectrum was stippled across the left, and the word “Fly” was written on with Memento Dual Tip Marker.
Pigment Ink
Pigment inks are also water-based, but with suspended pigment. It is more like when you try to mix sugar crystals into iced tea. Pigment inks lay on top of the paper, dry slowly and usually have a lush appearance. It acts much the same way acrylic paint does, coating a surface rather than soaking in. Pigment inks can do justice to your project by creating a dense, painted appearance. Pigment inks can have different appearances from a chalk-like matte finish, to pearlescent or super shiny metallics. It is also great for use with embossing powders since they do not dry right away. However, if you are not embossing be sure to allow for enough drying time before laying other items or colors on top. Nothing can be more heartbreaking to feel you created the perfect card then accidentally smudging it at the last minute. We offer many types of pigment inks including Brilliance, Delicata, Encore!, Fabrico Markers, Memento Luxe, Radiant Neon, VersaCraft,VersaColor, VersaFine, VersaMagic, and VersaMark. Embossing Powders are a popular accessory used with pigment inks.
VersaColor in Cyan was used to stamp art brushes on glossy paper, as well as VersaFine in OnyxBlack for a calligraphy pen stamp. Brilliance in Sunflower Yellow was stamped on black cardstock, while Black Shimmer Delicata was heat set with Clear Embossing Powder for a shiny ink bottle on a teal punched piece.
VersaColor in Cyan was used to stamp on glossy paper, as well as VersaFine in OnyxBlack for a calligraphy pen stamp. Brilliance in Sunflower Yellow was stamped on black cardstock, while Black Shimmer Delicata was heat set with Clear Embossing Powder for a shiny ink bottle on a teal punched piece.
Solvent Ink
Solvent inks are similar to dye inks, but instead of water-based are solvent based. Solvent inks dry super fast on paper, but also have staying power with surfaces such as plastic, glass, ceramics, and metal. They are kind of like Sharpie markers. It is common to use solvent ink on paper because the ink will not run with watercolors. Solvent inks are the perfect ink for mason jar projects, decorating cookie tins, and coloring plastic. Solvent inks are an exciting addition to the crafter’s toolkit because it allows a great deal of flexibility. Solvent ink is not compatible with alcohol-based markers like Copic—stick with the water-based inks for that. Make sure you have the proper cleaner for solvent inks to make clean-up worry free. StazOn is our solvent ink line, available in two sizes plus inkers. StazOn All-Purpose Stamp Cleaner will make sure clean-up is a snap.
StazOn in Jet Black was stamped onto white carsttock. Memento marker ink was then used with a watered brush to watercolor in the letters, which did not effect the stamped image. StazOn in Midnight Blue was used to stamp a dragonfly onto a piece of SHEET metal, while Emerald City StazOn was used on a piece of vellum.
StazOn in Jet Black was stamped onto white cardstock. Memento ink was then used with a watered brush to watercolor in the letters, which did not effect the stamped image. StazOn in Midnight Blue was used to stamp a dragonfly onto a piece of SHEET metal, while Emerald City StazOn was used on a piece of vellum.
After using all the types of inks, the behavior of the different inks will be apparent in the first couple of projects. Dye, pigment, and solvent inks are formulated differently to provide the most options for your crafting needs. These different ink varieties are to serve you, your project and your creative spirit.
A big thank you to Imagine Crafts for allowing us to share this wonderful article.
This article was published on Imagine Crafts blog found here:  https://imaginecraftsblog.com/2016/07/18/which-ink-should-i-use-in-my-project/

Posted by Mercantile & Artistic Paperie at 7:08 PM No comments:
Email ThisBlogThis!Share to XShare to FacebookShare to Pinterest

Wednesday, July 13, 2016

Canvas Apron


Today I would like to share this fun apron.  
It is such a fun project!! 


This video shows the apron & a description of  products.


Some of the items
Using the stamp to become a part of my art.

The above image shows where I took the image of stamp CRW092 Artist Elements & masked or randomly placed the image to become a part of my idea.  Because this apron was pre-made I pulled down the pockets just enough to make the image look as if they were tucked in. You can see that I left some of the original stamped ink visible and painted in places. By thinning your paint you can achieve a watercolor effect on the brushes. 

Using a black fabric Marker &/or Sharpie to define lines

This is using @Stampendous Fiesta stamp by Nathalie Kalbach to go along the hem of the apron. because they are cling stamps I was able to form them a bit more to the curve of the apron.

I love the Bluebirds by Stampendous super sweet & always practical stamp. 
 All paint used was mixed  with fabric medium


Dreamweaver Stencil leaves
Adding Stamp over stencil

Here I used the Dreamweaver Picasso & Leaves (jungle) along with acrylic paint and fabric medium.

Once it was dry I added Minuet Bird CRW089 with Versa Craft by Imagine Crafts. Then applied acrylic paint to dried ink. Finally  I detailed lines with black Sharpie &/or  fabric marker. 
 Fun project for many occasions!!!

 Great ideas for the many activities in life.
Such as: baking, cooking, sewing, gardening, "artisting" .... 
This would be great fun to do with your son or daughter as a family craft. 

Thank you for stopping by enjoy your day. -Ellie G.

Posted by Mercantile & Artistic Paperie at 1:21 PM No comments:
Email ThisBlogThis!Share to XShare to FacebookShare to Pinterest

Friday, July 8, 2016

"Nesting" Mini Album

 Hello- My name is Ellie Gamboa with Making Moments Beautiful and Mercantile & Artistic Paperie.  I am so very excited to be doing this class again. I had requests to make it into an album. Here it is, I hope you enjoy this sweet little mamma bird on her nest.  There is also information from this blog below posted on Thursday, November 19, 2015 & on Making Moments Beautiful.


Product list as follows:  +Stampendous  "Nestled Bird R158, "Bluebird Branch" M285, "Spring Sparkle" Embossing Powder Kit EK20, Dreamweaver stencil "Leaves" DWLJ 825, Copper Embossing Paste DWDCP,

Imagine Crafts: StazOn Ink Black, Mementa ink Black, Versa Marker, Brushstix/Doodlestix.

Kaiser Craft: Paper Collection "True Love" along with Mists & paints (no longer available in the U.S.A.)

Bella Blvd. little alpha stickers in olive green.

May Arts Ribbon: 434-78-28, 408-05-16, 419-16, 521-15-33, A487-58-01, & 372-1-10.

Basic Grey: stickers & diecut embellishments. BoBunny dot paper in coordinating colors.
Misc. items include: canvas board, up-cycled tissue paper.


Tools: Heat gun, detail scissors, Stipple brushes, paint brushes, & varies adhesives.

1.) An over all image of the project shows the items above in use.

1.)  Full album view 


2.) Detail of the embossing glitter this does not show all the detail and glitz.


2.) Embossing Powder &   3.) Copper Embossing paste


3.) Features the embossing paste in Copper & how it can be applied using a "Brushstix or Doodlestix". 
4.) View of the dimension 
4.) Shows how the dimension of the project turned out & you can see the up-cycled tissue paper.
 Feather made with embossing paste
May Arts Ribbon
Bella Blvd. alpha stickers

The tag 


 The video above will show more information.  Facebook Mercantile & Artistic Paperie  

If you are interested in this class head on over to Paper Arts to find out more information.


Posted by Mercantile & Artistic Paperie at 11:49 PM No comments:
Email ThisBlogThis!Share to XShare to FacebookShare to Pinterest
Newer Posts Older Posts Home
Subscribe to: Posts (Atom)

Translate

">

Blog Archive

  • ►  2017 (3)
    • ►  April (1)
    • ►  February (2)
  • ▼  2016 (10)
    • ►  October (2)
    • ►  August (2)
    • ▼  July (3)
      • Which inks to use for your project? - from Imagine...
      • Canvas Apron
      • "Nesting" Mini Album
    • ►  June (1)
    • ►  May (1)
    • ►  January (1)
  • ►  2015 (3)
    • ►  December (2)
    • ►  November (1)
  • ►  2013 (5)
    • ►  November (1)
    • ►  October (1)
    • ►  September (2)
    • ►  August (1)

About Me

Mercantile & Artistic Paperie
View my complete profile
Watermark theme. Powered by Blogger.