Mercantile & Artistic Paperie

...................................Your MAP to creativity.

Navigation

  • Home
  • Online Store

Thursday, August 18, 2016

Sweet Song 2016 12x12 canvas

The sweet song of the Robin in the spring or summer is a beautiful reminder of the journeys though out each season in life we attend. I will be doing a short overview of this canvas & hoping in the near future to make a video of the process. Video tutorials are in the works.


Featuring +Stampendous  Dreamweaver & Imagine Crafts.
See bottom of page for supplies.


Overall view of the whole canvas.
Please refer to this throughout the process
 Start by painting the canvas all over including the sides, top & bottom.  Paint approximately 2/3 in the blue I also added some down in the bottom lower right. The lower portions & middle should be a medium tone of green. I went up on both sides but more on the right-side then left. Make sure to follow the color around the sides, top & bottom.

While your canvas is drying stamp out all of your images & diecut them out. You can paint them or color them in at this time as well. I did 3 flowers 1 bird. One Nestled bird and extra flowers from the Nestled bird to add dimension to the flowers. I colored & cut out in detail. Make sure that you roll out plenty of the leaves from Leafy branch about 9-12. & a few of the leaves that come with the Bird Blossem Die.  Also 2 branches.  I used a piece of twisted cord for the branch under the Nestled Bird.


Clouds

Picasso 
& Stencil brush


To make the clouds prepare your Picasso by using the Removable Tape to the front & back of the stencil. ( This is to keep from marking the canvas incorrectly) We will be using the wave section on two parts of the stencil the short one and the long one.  This method of painting is called dry brush. To prepare your stencil brush you will need a Paper Towel handy or a rag.   Use a white paint &load up the brush then dab it off onto the paper towel. Predetermine the way you would like your clouds I flipped the stencil in different directions & used both waves to achieve this look. To add color start on the stencil & brush outward. You want more of the color up against the stencil & it to be more wispy as it fades away from the cloud. (special attention to the direction of your brush strokes-they need to go in the same direction to depict wind movement)


Stenciled leaves-
Stencil, Picasso, &  Stencil brush

To stencil the leaves prepare the leaves stencil with Removable tape around the edges to remove the border from your stenciling. Also you can take the tape and go around features of the leaves on the edges. Paint palette should have several colors of greens along with a rust or yellow ocher. Repeat the masking off of tape on both the front & back of stencil. You can also utilize the Picasso as well. Load your brush up with several colors & using the stencil Technic dab up & down turning your stencil around in different directions to give you the painted background.
[ Note do not work over an area that is wet other wise it will not give you crisp stenciled image of the leaves. Wait to dry. I worked one side then moved to the other. let dry & continued in the middle. Also stay on the green section only do not over lap onto the blue- that will be done in another step.  Make sure that the paint does not dry on the stencil. Place in your water tray if you are not able to clean it right away.]

Stenciled leaves
Leaf stencil, Picasso, Regular Embossing Paste, Palette Knife, 
& Spreader


This process will involve you preparing the stencil again with the removable tape. Please refer to Stampendous videos on how to create a hinge to use on the stencil. Read over care instructions on your stencil as well. This is a wonderful tool so care for it carefully. Have your water tray ready & set to your side. decide where you would like to add texture in your leaves. [ I added on the margin between the sky & tree overlapping into the blue so that it gave more dimension.] position your stencil the way you would like to place your leaves. Next load your spreader with the palette knife along the full top edge of the spreader make sure that you have a generous portion on the spreader. next lay on the tape hinge of the top of stencil & pull down at a 45 degree angel. lift & repeat step in another area that does not touch what you just did. You will need to allow to dry before you continue next to leaves you just did. [ I worked on opposite sides working in long sections as I could to get the most coverage] Make sure that you drop the stencil in water when not using. This is to keep the Embossing Paste from hardening on the stencil.
Once this process is completely dry lay your Picasso back over the tops of the white paste (it will fit like a puzzle) then repeat the process for the painted stencil leaves)

Word of caution before we start the next steps please use wisdom when operating the heat gun.They all get very hot!!  Not all heat guns work the same.  We will be heating from the underside of the papers & canvas. All of the items can burn so make sure that you are focused in the process. I use a slow swaying motion when my heat gun gets hot so that it does not burn. I also angled my gun up under the corners of the canvas to get behind the wood. { you can also heat the surface before beginning which will help the E.P. to stick a little bit more}  Another trick is to start way above the top side of area & slowly bring your heat gun in. Allowing it to heat slowly & not blowing all of the E.P. off of your work area.

Embossing the sky & sides
Versa Mark, Versa Marker, Shabby White & Shabby blue 


 Take the Versa Marker and move in an outward direction the same as your brush strokes and add some detail on the back part of the clouds. then add embossing powder shake off access. Heat

Next on the edge & top corner use the Versa Pad in the same manner you would to distress edges with ink. then add powder & heat. If you would like it thicker while it is hot add more E.P.

Repeat this process on bottom & top right edge with the greens while the E.P. is hot you can throw on some Fragments & glitter. If they give you hard time to stick heat E.P. that has already been put down & add some Deep Impressions heat over top of the Fragments & glitter.

Birds & flowers
Use the coordinating colors for each item.
Clip tool, Versa Marker, Aged Rose, Shabby Pink, & Aged Taupe


 Using the Versa Marker color in where  you would like to add the E.P. Take the Clip tool & then add E.P. & heat from underneath.

 Leaves
Versa Mark Pad, Stuftainer, Clip took, coordinating embossing powders, Deep Impression, glitter, & fragments.


Place the colors in the Stuftainer you would like to use, mix up. Ink your leaves then lay into try and dredge them in the mix. using clip tool repeat process to heat.  

Nest & branches

Nestled Bird, Seasonings, Deep Impression, Spoonful of Rust, Mini Stuftainer & Clip tool.


Ink the area of the nest with Versa Mark. Then lay down Seasonings. Heat up while hot place in Stuftainer & pour on Spoonful of Rust add Deep Impressions as needed. Heat while hot continue to build up layers of color until you get a nice dimension of E.P. on the next letting the bird appear to sit inside nest.


Flowers on Nest 
Versa Marker, Clip Tool, & Spring Sparkle

I used extra flowers & cut them between petals you can attach these along the branches. Make them layered I used the Versa Marker & Spring Sparkle to add the E.P. glimmer. Heat.

The twisted branch section is just inked. The branch under the male Robin & up in the top right corner are embossed in layers.

Next arrange your canvas how you would like. Adhere your pieces. 
To add more glitter & Fragments in any area you would like lay down the Versa Mark & use Deep Impressions or coordinating colors to adhere to canvas. Heat. 

When you have completed your canvas place a picture. 
 Vellum would work nice. 

Thank you for taking the time to learn this process. I loved it. It took some time to complete but I am really happy I did. -Ellie G.


Versa Mark over top 
& sprinkle with E.P., heat

What you will need from


Stampendous:
Bird Blossom Die & stamp    DCS5083 & CRS5083
Nestled Bird                           CRR158
Beautiful Life                         CRV273

Embossing Powders:

Aged Copper- FREG025-Leaves, branch & nest 
Aged Gold-    FREG024-leaves
Aged Green-  FREG043 -leaves
Aged Tuape-  FREG033 -male robin
Aged Rose-    FREG031 -flowers


Deep Impressions-  FREG004-to set fragments & glitters


Fragments Leaf Green- FRC13- Tree Background

Glass glitter Champagne- FRG02C
Glass glitter in either Green- FRG06C or FRG12C

PEARLustre Jade-  EP232-leaves backdrop


Seasonings-     FREG044- leaves, nest, branch & background

Shabby Blue-   FREG029- sky
Shabby White- FREG027-clouds, & sky

Spoonful of Rust-  EJS05- Nest

Spring Sparkle-     EK20- flowers on Nest

Vintage Olive-       TP118- leaves & background 


Stampendous Tools-
Clip tool- FX72 used to hold loose die cut pieces for embossing
Mini Stuftainers -STOR05- to dredge leaves in, build up layers & to work over.

Clear Handle- SSH46 or SSH34- to adhere cling stamp


Dreamweaver:


Jungle Leaf Stencil- DWLJ 825- background leaves
Leafy Branch Die- DWDD003 - leaves
Regular Embossing Paste- DWDEP-leaves
Removable tape- RMT- used to mask off stencil & Picasso tool
Palette Knife- DWDPK- to apply Paste to spreader & small details
Picasso-    DWLL332-clouds & mask for leaves
Spreader- DWLM2010 -leaf Stencil
stencil brushes 1/2"-DWNHB-12


Imagine Crafts:

Memento Tuxedo Black-ME-000-900 -all stamping
Memento Dual Tip Marker Rich Cocoa- PM-000-800-used to outline the word "Beautiful" 
Versa Mark Clear-VM-000-001- used to emboss large areas
Versa Marker clear- PV-000-001- used to add embossing powder to sky & fine areas


Misc.


12 x 12 canvas

White, Kraft & Green Cardstock
Acrylic Paints- sky blue, white, colors for your Robin's (tawny brown, black, rust, orange, & white) You can make this your own and do your own coloring of the birds. Stampendous Stamps make the birds generic enough that you can do a large number of types of birds. Try using bird field guides for added help. I love the process of painting with the Embossing Powders as it allows forgiveness for any mistakes in the painting.

Tools:

heat gun
Paint brushes
Large shallow flat plastic container 
Finger nail cleaning brush


Posted by Mercantile & Artistic Paperie at 2:05 PM No comments:
Email ThisBlogThis!Share to XShare to FacebookShare to Pinterest

Tuesday, July 19, 2016

Which inks to use for your project? - from Imagine Crafts

Imagine Crafts has published a wonderful article expressing how to use inks properly for the many different arrays of  crafts on the market.  Please enjoy this article by Imagine.

Which Ink Should I Use in My Project?


Posted on July 18, 2016 by Imagine

That’s a Great Question!


Whether you are just learning to craft, scrapbook, or art journal, or are a seasoned pro, it can still be overwhelming to make buying decisions with all the different products available. There are just so many options! You’ve decided on a project, what your medium is going to be and now you just need some ink—but you find out that too is complex. Often there is no exact right or wrong between different inks therefore choosing which one can seem overwhelming. Here’s some information about the different inks you will find to hopefully help you know what inks you might need for your projects!
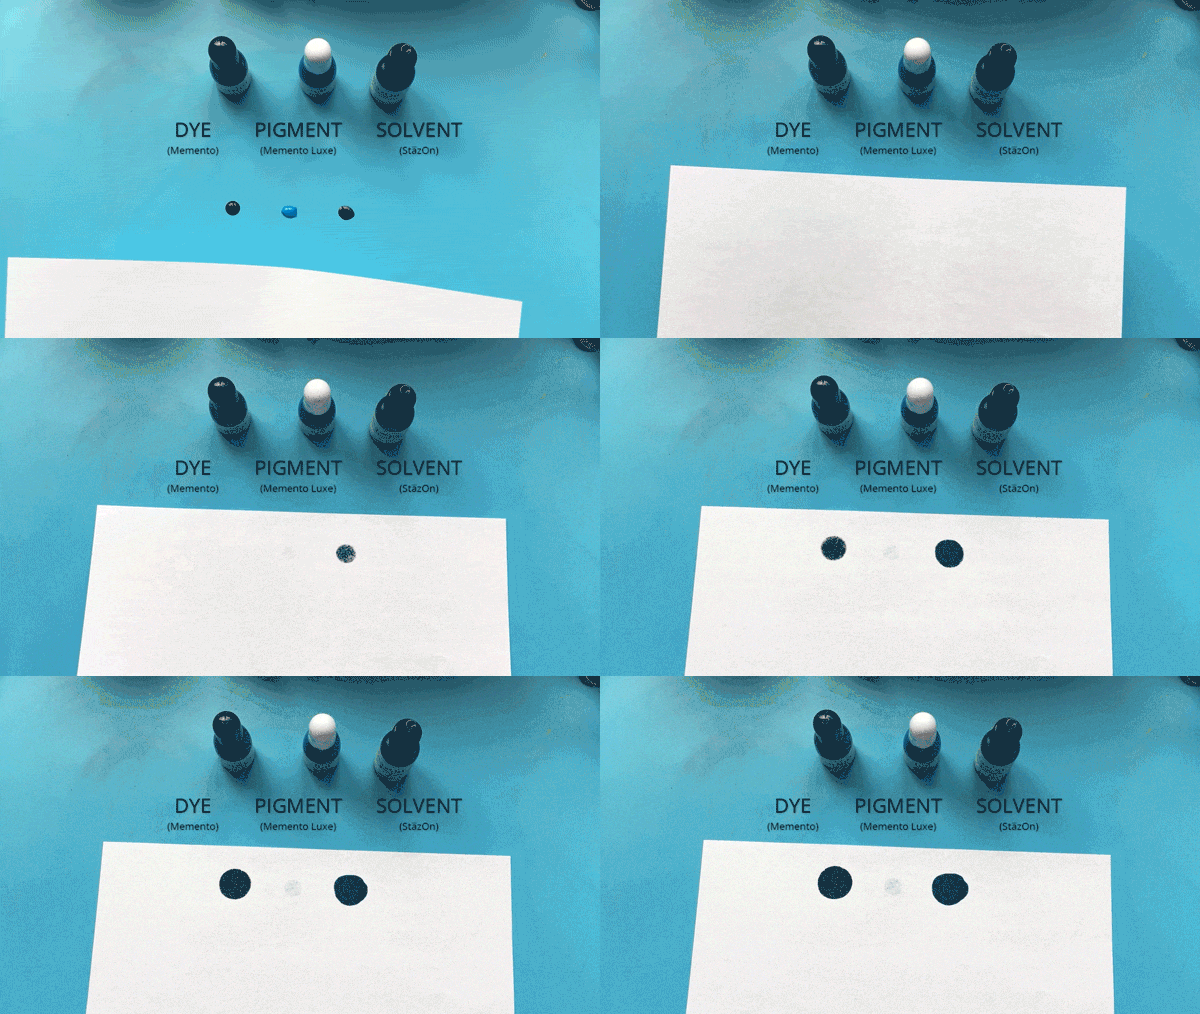
We break it down into three types of ink: dye ink, pigment ink, and solvent ink. Most of the varieties offered for papercrafters are dye and pigment inks, but sometimes solvent inks are just what you need, plus they work great for glass, metal and ceramics as well. In building your knowledge, it is best to know how each type of ink behaves to determine what option you need to achieve your project’s desired result.
A white piece of text paper is laid across three puddles of ink, one dye, one pigment and a solvent ink. The dye and solvent inks absorb into the paper while the pigment ink does not.
Dye Inks
Dye inks are made up of a water-based solution and a soluble dye. Soluble means they mix in to the water like sugar in tea. Dye inks soak into paper, dry quickly, and usually have a bright translucent appearance. Picture the dye inks bleeding down into the paper and coloring the paper fibers. It is similar to how food coloring blends into food. The quick drying time can be an asset as you can stamp a card and place it in an envelope without worry of smearing or staining. They can also be used much like watercolor paints and be blended and softened by adding water to the ink or pre-wetting your paper. Dye ink fades a bit over time, particularly in direct sunlight. This is why dye inks have non-visible palette cases—a super easy way to distinguish from the pigment inks at the craft store. Our lines of dye inks include Memento, Kaleidacolor, Fireworks! Sprays and Walnut Inks. Ink Potion No. 9 is a popular blending solution often used with dye inks.
Watercolor paper was sprayed down with Ink Potion No. 9 before sweeping Memento Summer Sky across it. A wet brush was used to watercolor some Memento Pear Tart along the bottom edge. Memento Love Letter inkpad used with a cute kite stamp, Kaleidacolor in Spectrum was stippled across the left, and the word Fly was written on with Memento Dual Tip Marker.
Watercolor paper was sprayed down with Ink Potion No. 9 before sweeping Memento Summer Sky across it. A wet brush was used to watercolor some Memento Pear Tart along the bottom edge. Memento Love Letter inkpad used with a cute kite stamp, while Kaleidacolor in Spectrum was stippled across the left, and the word “Fly” was written on with Memento Dual Tip Marker.
Pigment Ink
Pigment inks are also water-based, but with suspended pigment. It is more like when you try to mix sugar crystals into iced tea. Pigment inks lay on top of the paper, dry slowly and usually have a lush appearance. It acts much the same way acrylic paint does, coating a surface rather than soaking in. Pigment inks can do justice to your project by creating a dense, painted appearance. Pigment inks can have different appearances from a chalk-like matte finish, to pearlescent or super shiny metallics. It is also great for use with embossing powders since they do not dry right away. However, if you are not embossing be sure to allow for enough drying time before laying other items or colors on top. Nothing can be more heartbreaking to feel you created the perfect card then accidentally smudging it at the last minute. We offer many types of pigment inks including Brilliance, Delicata, Encore!, Fabrico Markers, Memento Luxe, Radiant Neon, VersaCraft,VersaColor, VersaFine, VersaMagic, and VersaMark. Embossing Powders are a popular accessory used with pigment inks.
VersaColor in Cyan was used to stamp art brushes on glossy paper, as well as VersaFine in OnyxBlack for a calligraphy pen stamp. Brilliance in Sunflower Yellow was stamped on black cardstock, while Black Shimmer Delicata was heat set with Clear Embossing Powder for a shiny ink bottle on a teal punched piece.
VersaColor in Cyan was used to stamp on glossy paper, as well as VersaFine in OnyxBlack for a calligraphy pen stamp. Brilliance in Sunflower Yellow was stamped on black cardstock, while Black Shimmer Delicata was heat set with Clear Embossing Powder for a shiny ink bottle on a teal punched piece.
Solvent Ink
Solvent inks are similar to dye inks, but instead of water-based are solvent based. Solvent inks dry super fast on paper, but also have staying power with surfaces such as plastic, glass, ceramics, and metal. They are kind of like Sharpie markers. It is common to use solvent ink on paper because the ink will not run with watercolors. Solvent inks are the perfect ink for mason jar projects, decorating cookie tins, and coloring plastic. Solvent inks are an exciting addition to the crafter’s toolkit because it allows a great deal of flexibility. Solvent ink is not compatible with alcohol-based markers like Copic—stick with the water-based inks for that. Make sure you have the proper cleaner for solvent inks to make clean-up worry free. StazOn is our solvent ink line, available in two sizes plus inkers. StazOn All-Purpose Stamp Cleaner will make sure clean-up is a snap.
StazOn in Jet Black was stamped onto white carsttock. Memento marker ink was then used with a watered brush to watercolor in the letters, which did not effect the stamped image. StazOn in Midnight Blue was used to stamp a dragonfly onto a piece of SHEET metal, while Emerald City StazOn was used on a piece of vellum.
StazOn in Jet Black was stamped onto white cardstock. Memento ink was then used with a watered brush to watercolor in the letters, which did not effect the stamped image. StazOn in Midnight Blue was used to stamp a dragonfly onto a piece of SHEET metal, while Emerald City StazOn was used on a piece of vellum.
After using all the types of inks, the behavior of the different inks will be apparent in the first couple of projects. Dye, pigment, and solvent inks are formulated differently to provide the most options for your crafting needs. These different ink varieties are to serve you, your project and your creative spirit.
A big thank you to Imagine Crafts for allowing us to share this wonderful article.
This article was published on Imagine Crafts blog found here:  https://imaginecraftsblog.com/2016/07/18/which-ink-should-i-use-in-my-project/

Posted by Mercantile & Artistic Paperie at 7:08 PM No comments:
Email ThisBlogThis!Share to XShare to FacebookShare to Pinterest

Wednesday, July 13, 2016

Canvas Apron


Today I would like to share this fun apron.  
It is such a fun project!! 


This video shows the apron & a description of  products.


Some of the items
Using the stamp to become a part of my art.

The above image shows where I took the image of stamp CRW092 Artist Elements & masked or randomly placed the image to become a part of my idea.  Because this apron was pre-made I pulled down the pockets just enough to make the image look as if they were tucked in. You can see that I left some of the original stamped ink visible and painted in places. By thinning your paint you can achieve a watercolor effect on the brushes. 

Using a black fabric Marker &/or Sharpie to define lines

This is using @Stampendous Fiesta stamp by Nathalie Kalbach to go along the hem of the apron. because they are cling stamps I was able to form them a bit more to the curve of the apron.

I love the Bluebirds by Stampendous super sweet & always practical stamp. 
 All paint used was mixed  with fabric medium


Dreamweaver Stencil leaves
Adding Stamp over stencil

Here I used the Dreamweaver Picasso & Leaves (jungle) along with acrylic paint and fabric medium.

Once it was dry I added Minuet Bird CRW089 with Versa Craft by Imagine Crafts. Then applied acrylic paint to dried ink. Finally  I detailed lines with black Sharpie &/or  fabric marker. 
 Fun project for many occasions!!!

 Great ideas for the many activities in life.
Such as: baking, cooking, sewing, gardening, "artisting" .... 
This would be great fun to do with your son or daughter as a family craft. 

Thank you for stopping by enjoy your day. -Ellie G.

Posted by Mercantile & Artistic Paperie at 1:21 PM No comments:
Email ThisBlogThis!Share to XShare to FacebookShare to Pinterest

Friday, July 8, 2016

"Nesting" Mini Album

 Hello- My name is Ellie Gamboa with Making Moments Beautiful and Mercantile & Artistic Paperie.  I am so very excited to be doing this class again. I had requests to make it into an album. Here it is, I hope you enjoy this sweet little mamma bird on her nest.  There is also information from this blog below posted on Thursday, November 19, 2015 & on Making Moments Beautiful.


Product list as follows:  +Stampendous  "Nestled Bird R158, "Bluebird Branch" M285, "Spring Sparkle" Embossing Powder Kit EK20, Dreamweaver stencil "Leaves" DWLJ 825, Copper Embossing Paste DWDCP,

Imagine Crafts: StazOn Ink Black, Mementa ink Black, Versa Marker, Brushstix/Doodlestix.

Kaiser Craft: Paper Collection "True Love" along with Mists & paints (no longer available in the U.S.A.)

Bella Blvd. little alpha stickers in olive green.

May Arts Ribbon: 434-78-28, 408-05-16, 419-16, 521-15-33, A487-58-01, & 372-1-10.

Basic Grey: stickers & diecut embellishments. BoBunny dot paper in coordinating colors.
Misc. items include: canvas board, up-cycled tissue paper.


Tools: Heat gun, detail scissors, Stipple brushes, paint brushes, & varies adhesives.

1.) An over all image of the project shows the items above in use.

1.)  Full album view 


2.) Detail of the embossing glitter this does not show all the detail and glitz.


2.) Embossing Powder &   3.) Copper Embossing paste


3.) Features the embossing paste in Copper & how it can be applied using a "Brushstix or Doodlestix". 
4.) View of the dimension 
4.) Shows how the dimension of the project turned out & you can see the up-cycled tissue paper.
 Feather made with embossing paste
May Arts Ribbon
Bella Blvd. alpha stickers

The tag 


 The video above will show more information.  Facebook Mercantile & Artistic Paperie  

If you are interested in this class head on over to Paper Arts to find out more information.


Posted by Mercantile & Artistic Paperie at 11:49 PM No comments:
Email ThisBlogThis!Share to XShare to FacebookShare to Pinterest

Monday, June 27, 2016

Very excited to share the good news....coming this fall..

I am so excited to be announcing that we will have a new member on our team that will be helping out with all kinds of technical & over all support. Looking forward to the blessing of having Valerie Wade soon to be Casto join our team this fall. 
May, June, July...... Counting the "days" to have her on board.

Not only is she brilliant, sweet, warm, & creative but she is a young lady taking a stand for CHRIST & making her path straight as she joins in the ministry to go forward for our LORD & Savior JESUS!

Go team JV!! (Jacob & Valerie) I have had the wonderful privilege of getting to know her through the ministry of Chi Alpha at the University of Oklahoma. She has been on staff this past year-although I have not had the opportunity to hear her personally speak, I have had the beauty of hearing the impact through my daughter's notes as she shared the nights messages. 

A big shout out to Chi Alpha for making an impact in the lives of students on campuses across the world. 

So as we shove off the shores of certainty, most would say uncertainty;  but with CHRIST behind the wheel I am certain of one thing....(in the words of Kendra Shearer) "GOD's got this!!"  
The one thing I can always be certain of 
                           -HE is with us.  
Anticipating great CHRISTian fellowship, wonderful music & growth; as we move forward in this endeavor the LORD has placed before us.  

As you journey along preserving your memories may we come beside you with inspiration & be a M.A.P. 2 creativity.  
                                                        
Making every Moment beautiful because every moment counts!!! 

This fall looking forward to more possibilities.  
Limited class kits will be made available in the future along with instructions &/or video tutorials.
Stay tuned. 
                               -Ellie Gamboa

Posted by Mercantile & Artistic Paperie at 3:20 PM No comments:
Email ThisBlogThis!Share to XShare to FacebookShare to Pinterest

Tuesday, May 17, 2016

Beach Album-Collection of Memories

This Mini Album & chipboard fence - by Clear Scraps
 Paper showcase- Kaiser Craft "Coastal Escape" Collection.
Embossing Powders-Stampendous
The techniques that I will be teaching include Embossing Powders- "Oh, there is so much more" 
& 
 Misting techniques -"more than paper".  
Hope you enjoy this journey with us as we play in the sand & get a little messy. 

This class will feature an "upcycle" of products.


Paper Arts Edmond, Oklahoma June 2nd 4-7 p.m.. Call to make your reservations today.


 An according album measures 4"x12".  Crease at 3".
You can put up to 5 photos or a combination of journals & pics.


According album with a matching mat.

This is the other side features a quote from Stampendous SSC1246 stamped on vellum.


Features according tissue paper with some pull out tags to journal etc

 I revisited tearing & made many layers using Kraft tissue paper & Cardstock for sand; as well as the waves. The fence on this page is kept loose. - Adds a bit more interest to this page. 
Waves & sand have also been embossed.

  Photos can be copied out on vellum or you can just mount directly to the page.
To add some fun to this album-try copying on vellum or use black & white photo; color in highlighted areas of photo with photo paint or markers. 
This adds beautiful soft detail for a special photo.


 Across from the torn sand & waves you will see that the castle has been covered with Misted kraft cardstock. Behind the dry embossed wave (Dreamweavers) is more of the tissue paper

 upcycle tip- you can us old gift tissue you hated to throw away)  crinkle & misted.


 Another mini album with removable tag is laying freely on top. This can be taken out & used alone.


Mat was dry embossed Dreamweaver stencil "Waves" lightly sanded on top or mist with Turquoise & wipe to add highlights & shadowing. Also featured is the embossing of the edges with Chunky white to give the effect of sea mist. 
I was very pleased with how this turned out & I did not want to cover it up so that is why the mini album is completely removable.


 Upcycle- your work area!! Because this is a very messy project & was super fun to create. There was one more page & I really wanted to add interest to the window portion of this project without using the Exacto-knife. My solution; the wax paper I had been using to spray the fishing net & other items was beautiful.  I mounted this using versa mark & covered in embossing powder detail clear. Heat & laid the wax paper on top, re-heat on top of the wax paper any areas that did not stick. Finally cut out around the areas leaving windows intact.
Effect- stained glass at the beach.


 Final page- this pocket was covered in Kaiser Craft paper. The pocket was made using Coastal Escape paper and a piece of the rope from the boarder paper of the same collection. this pocket can hold more pics or it can be used to store maps, tickets etc.
Below you will find more pictures of different parts of the album & some of the items used to make this fun project.


 I started out not sure how I was going to cover all of the pages so I white-washed all of the boards & took a wet-wipe & distressed all the edges.  This turned out well on this page because I just embossed the front using versa mark and sand mix from Stampendous.


The placement of the Misted Kraft Tissue Paper. I actually did not have to use the Exacto-knife here. I used my finger nails & fingers pushing in a downward motion away from the board. I used the board as a sharp edge. Because the tissue paper was still damp it was easy to tear.


After the sand was laid out on the pages. Also shown is painting with embossing powder. Love this technique. My sand used in the project was the following -Stampendous :  Chunky white, sand, (from the Beach kit), Spoonful of Rust EJS05, Deep Impression , Frantage crushed glass in either silver or champagne will work. Have fun & make your sand uniquely your own. 


The fishing net used for different placement.
This can be mist with Kaiser Mists and then while it is still wet you can add some embossing powder from the Beach Embossing Kit included with the Sand. Item EK22 from Stampendous.

You can also, use the Kaiser Mist White. It is not very noticeable on this project but it did add some muteness to the color and also a bit more iridescence. Which I loved.


Because I used my wax paper on multiple occasions - I picked-up the color with the white paper above & will be using that on another project.


Layout for page 3 & 4.

Notice I left the bottom blank to conserve on paper. I had one sheet that I was using in other places.

The blank area of page 4 is where the pleated "kraft tissue paper" will be placed. So that the tags and shells can snuggle into this area

.

This is page 5. the fence is covered on this side with the Coastal Paper by Kaiser Craft.


 The wax paper as I was determining the placement. You can see the fun colors .

 I suggest setting aside one piece of wax paper for your blues.  It also had a bit of the white embossing powder where I had embossed the sea-mist.


Above the items used to make the back cover before heat embossed. Below the finish after hear set.

 Please visit your local mom & pop Scrapbook/Craft store for products.
Support small businesses.
                                  
           Here is a list of products used in this project:


Clear Scraps-CBAsndcsl & CSCEfence

Stampendous-DCS5088 (Clam Shell Die), SSC1246 (Ocean Wisdom), DWLJ838 (Waves Stencil),
                       EK22 (Beach Embossing Powder), EJS05 (Spoonful of Rust), EP020 (Clear),  &                                      (VM001) Versa Mark Pad.
                       Extra items but not necessary- FRG01C &/or FRG02C (crushed glass glitter)
                                      and FREG004 (deep impression-used to hold large items)
Imagine Crafts- Versa Mark pad, pen & re-inker, StazOn (Timber Brown 041), Walnut Ink                                              (Cornflower 006)*

Kaiser Craft- Coastal Escape 12x12 Paper Pack (PK529), Sea Shells (PS443), & Paper "Water"                                        (P2059),  Kaiser Mists in Turquoise, &  Denim*. 

                                          I used Tattered Angels Rich Mocha for the sand. 

* I did not have the Kaiser Denim but you could use either one of the blues to add a spritz of the darker blue found in the Coastal Escape collection.

May Arts Ribbon  

In addition- I used a white ink on some of the matting & tags. White paint, wet wipes, Cardstock                              in coordinating colors one light and one dark of the Turquoise, plus kraft.

Tools: Trimmer (I love my new Tonic), Glue, micro-tip scissors, embossing gun, wax paper, wet                     wipes, rubbing alcohol spray, mat for exacto-knife & the knife. 

                  This video of how to use the Dreamweaver with a die-cut machine is very helpful. 

I hope you have enjoyed this wonderful project. I enjoyed making it and it is a wonderful way to                                                            "Collect Memories in the Sea of Life."


  Making Moments Beautiful 

                                ......as you find inspiration every day             

               Mercantile & Artistic Paperie your journey to creativity.

                Thank you for stopping by and allowing us to be a part of your creativity-Ellie G.


Posted by Mercantile & Artistic Paperie at 8:37 PM No comments:
Email ThisBlogThis!Share to XShare to FacebookShare to Pinterest
Newer Posts Older Posts Home
Subscribe to: Posts (Atom)

Translate

">

Blog Archive

  • ▼  2017 (3)
    • ▼  April (1)
      • Ganus Family 50th Wedding Album
    • ►  February (2)
  • ►  2016 (10)
    • ►  October (2)
    • ►  August (2)
    • ►  July (3)
    • ►  June (1)
    • ►  May (1)
    • ►  January (1)
  • ►  2015 (3)
    • ►  December (2)
    • ►  November (1)
  • ►  2013 (5)
    • ►  November (1)
    • ►  October (1)
    • ►  September (2)
    • ►  August (1)

About Me

Mercantile & Artistic Paperie
View my complete profile
Watermark theme. Powered by Blogger.